
In this tutorial we are going to create a Pop Singer Poster
using some colors and shapes like circles. For this particular tutorial, we are
going to use two images as a material. First we need a model; we are going to
use the image of Ms. Goo Hara, a famous actress in South Korea. Here are the
materials we need:>>>>> *credits: Photos are from their respective owners. SO DON'T SUE ME. <<<<< -denztriker

Image Portrait of Ms. Goo Hara

Dark Cloud Texture
Let’s start opening the Dark Cloud Texture in Photoshop. Use
this size: 3000 x 2400 pixels landscape.

Then open the image of the model in Photoshop. Just select
the whole body, not the background. Use pen tool or magic wand tool or magnetic
lasso tool in selecting the image.

After selecting as a mask, copy it and paste it on the
canvass we created.

Duplicate the layer and set the layer blending mode to
Linear Burn and Opacity to 25%.

Click on add effect icon located below of the layers window.
Go to Inner shadow and set the following values:
Blend Mode: Normal ; Color: Black ; Opacity: 100% ; Angle:
145 ; Distance: 15px ; Choke: 0% ; Size: 75px.

Then click on Drop Shadow style, set the following values:
Blend Mode: Multiply ; Color: Black ; Opacity: 75% ; Angle:
145 ; Distance: 34px ; Spread: 11% ; Size: 76px.

Then finally, click on the Inner Glow style, set the
following values:
Blend Mode: Screen ; Color: Black ; Noise: 0% ; Technique:
Softer ; Source: Center Choke: 20% ; SIze: 65px ; Range: 50% ; Jitter: 0%.

Then this is the result of the effects we used.

Create a new layer above all the layers. Use the Elliptical
Marquee Tool and create a circle mask like I did below:

Then Fill the mask with color Red.

Create a new layer again and move the selection on another
place, like this one:

Then Fill it with color Yellow.

Repeat the same procedures and create two more circles, fill
it with blue and green respectively.

Use the eraser tool with soft edge. Hardness to zero.

Erase some parts of the circle like the image as shown
below:

Then merge all the circle layers. In order to unite the
circles as one layer.

After that, go to Filter>>> Blur>>>
Gaussian Blur. Set the radius to 6 pixels.

Result after Gaussian Blur:

Then duplicate the circle layer (Ctrl+J) and go to Edit
>>> Transform >>> Flip Horizontal.

After flipping horizontal.

Resize the flipped circle layer and move it down like this
image below. And merge the two circle layers.

Then go to the background layer. Duplicate it and put the
duplicated background layer above the circle layer. Set the layer blending mode
to Linear Dodge (Add).

Create a new layer above the background copy layer. Use the
polygonal lasso tool and create spikes like this.

After that, fill it with color White.

Set the layer blending mode to Soft Light.

Go to Filter>>> Blur>>> Gaussian Blur. Set
the Radius to 35 pixels.

Result after using the Gaussian Blur effect.

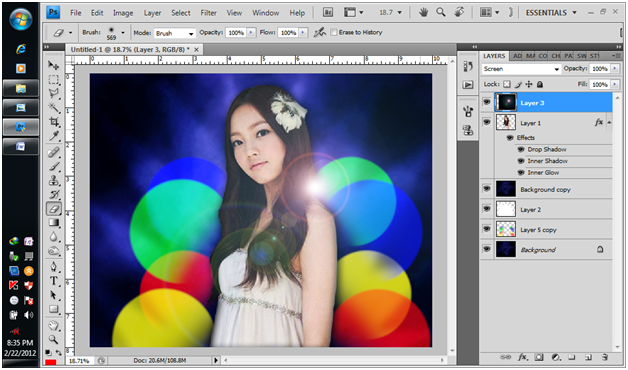
Let’s add some lights. Create a new layer above all the
layers and fill it with black.

Go to Filter>>> Render>>> Lens Flare. Set
brightness to 100% and Lens type to 50-300mm Zoom.

Result of the Lens Flare effect.

Set the layer blending mode to Screen.

Go to Image>>> Adjustments>>> Color
Balance. Set the color levels: -100, -44, -22.
Use the eraser tool with soft edge and delete the part that
covers the face.

Result after erasing.

And this is the final result after the effects. I just add
some text for the name of the model and the name of my website.


0 (mga) komento:
Post a Comment