
For this tutorial,(For
the first time, I am not using my personal picture as a model! haha) I will
show you on how to create mental sphere and get realistic reflection from
environment to this sphere.
>>>>> *credits: Photos are from their respective owners. SO DON'T SUE ME. <<<<< -denztriker
>>>>> *credits: Photos are from their respective owners. SO DON'T SUE ME. <<<<< -denztriker
Materials needed:
Mountain photo

Fairy Photo

Now let’s start!
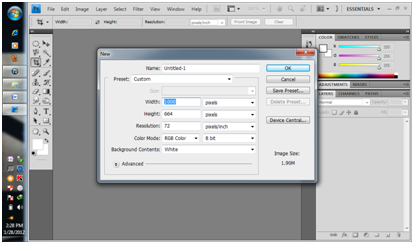
Open Photoshop. Then
create a preset with width to 1000px and height to 664px.
Then Copy the
Mountain Photo located in this site then pasted it on the new canvas you
created. Resize it to fit in.

Then open the
Fairy photo in Photoshop. Copy the whole image then paste in on the Mountain
Photo. Resize the Fairy photo. Just like the image shown below.

Then use Magic
Wand Tool with a Tolerance of 29% then select the background of the Fairy tool.
After selecting the main background, press Delete.

Remove selection
with Select > Deselect, then correct brightness and contrast with Image >
Adjustments > Brightness/Contrast: Brightness: 11 Contrast: -25.

Select background
layer, the Mountain photo layer. Make round selection with Elliptical Marquee
Tool on it. Like this one:

Press Ctrl+J to
duplicate selected area to new layer. Select content layer by pressing Ctrl and
clicking on thumbnail layer on layers. Then Load the sphere selection by going
to Select >>> Load Selection.

Then apply Filter >>> Distort
>>> Spherize.


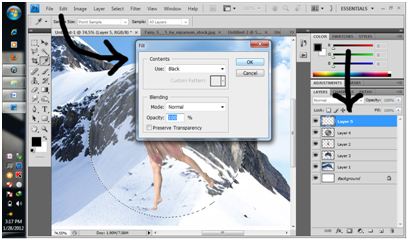
With selection
still active, create new layer above all layers and fill it with black color.


Apply Filter
>>> Render >>> Clouds to this layer.


Apply Filter
>>> Distort >>> Spherize.


Change layer mode
to Screen and lower opacity to 50%
 .
.
With selection
still active, create new layer above all layers and fill it with black color.

Deselect area with
Ctrl+D an update layer opacity to 0%. After that go to Layer >>> Layer
Style >>> Inner Glow and apply style with following settings:

And here is our
final result. Don’t forget to save your work as PSD then create a backup.
I hope you like
it.
0 (mga) komento:
Post a Comment